This week I’m planting potatoes, and if you’ve followed VanZylStead for a while, you’ll know that my favourite way to grow potatoes is in hay. I’ve grown potatoes in the ground, in containers and in raised beds, but I keep coming back to hay. It’s simple, harvesting is an absolute pleasure, and there is something incredibly satisfying about lifting a layer of hay and finding beautiful potatoes hiding underneath.
And the best part? Very little digging! So, if you’ve never tried growing potatoes in hay, this season might just be the time.
Why grow potatoes in hay?
Traditionally, potatoes are planted into the soil and then earthed up as they grow. This works really well, but growing them under a thick layer of hay gives us another option. Instead of continuously pulling soil around the plants, we use hay to cover the developing potatoes.
There are a few reasons I love this method:
Harvesting is much easier.
There is less digging and soil disturbance.
The hay helps retain moisture.
It helps suppress weeds.
Potatoes are generally much cleaner when harvested.
You can simply move the hay aside to check how your crop is developing.
Over time, the hay starts breaking down and adding organic matter to the garden.
For a home gardener, it really is a lovely way to grow potatoes.
First things first – choose your potatoes
Whenever possible, I recommend planting certified seed potatoes rather than potatoes from your kitchen or supermarket. And there is a very good reason for this.
A potato you buy from the supermarket may look perfectly healthy and be completely safe for you and your family to eat, but that doesn’t necessarily mean it is the best potato to put into your garden. Potatoes can carry pathogens responsible for diseases such as potato scab, bacterial diseases and other soil-borne problems. You may not necessarily see anything wrong with the potato when you plant it.
The problem comes when you introduce an infected potato into your vegetable bed. Some potato pathogens can survive in the soil for years, and once certain diseases have been introduced, they can be very difficult to manage or eliminate. That is why certified seed potatoes are worth using. They are produced specifically for planting and are inspected and managed to reduce the risk of carrying important potato diseases.
But what if supermarket potatoes are all you have?
We’ve all had that bag of potatoes in the cupboard that suddenly starts sprouting. 😂 Yes, you can grow them. But if you really want to experiment with sprouting supermarket potatoes, my preference would be to plant them in a container or grow bag rather than directly into your permanent vegetable beds.
That way, if there is a disease problem, you haven’t potentially introduced it into the soil where you grow your vegetables season after season. Use a separate growing medium and, if the plants show signs of disease, don’t simply tip that soil into your veggie beds or compost heap afterwards. For me, it’s simply about reducing unnecessary risk. Safe to eat doesn’t always mean disease-free planting material. When I’ve spent years building healthy soil, I don’t want to introduce a problem unnecessarily for the sake of saving a few rand on seed potatoes.
What about those little sprouts?
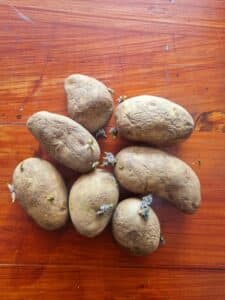
Before planting certified seed potatoes, you may notice little shoots or “eyes” starting to develop. This is exactly what we want. You can also chit your potatoes before planting. Chitting simply means allowing the potatoes to start producing short, strong shoots before they go into the garden.
Place them somewhere cool and bright, but out of harsh direct sunlight, and allow those shoots to develop. You don’t need enormous shoots. Short and sturdy is what we’re after.
Do you need to cut your potatoes?
Not necessarily. Small seed potatoes can be planted whole. If you have larger seed potatoes, they can be cut into pieces, provided that each piece has at least one or two healthy eyes. If you do cut them, allow the cut surfaces to dry and callus before planting rather than putting a freshly cut potato straight into damp conditions. Personally, if they’re a nice manageable size, I prefer planting them whole.
Preparing the bed
One of the misconceptions about growing potatoes in hay is that you don’t need good soil. You still do. The roots of the potato plant grow down into the soil to find water and nutrients, while the developing potatoes form around the plant and can be protected by the hay above. Before planting, I prepare the bed with a good layer of well-matured compost and make sure the soil underneath is loose and healthy.
Remember, potatoes are hungry plants. Starting with healthy soil makes a big difference. Avoid using lots of fresh manure or extremely nitrogen-rich fertiliser. Too much nitrogen can give you enormous, beautiful leafy plants but disappoint you when it comes time to look for potatoes! We want to encourage tuber development, not just leaves.
How I plant my potatoes in hay
This is where it gets wonderfully simple. I place my seed potatoes onto the prepared soil or into a very shallow depression, with the strongest shoots or eyes facing upwards. I generally leave around 30 cm between potatoes, with more space between rows if I’m planting several rows.
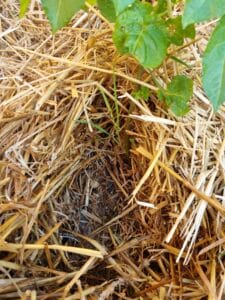
Then comes the hay. Cover the potatoes with approximately 15–20 cm of loose hay. Don’t squash it down into a solid mat. We want a nice loose layer that still allows the shoots to find their way through. Then water the bed well. And wait. Soon those first green shoots will start appearing through the hay.
Keep adding hay
This is probably the most important part of the whole method. As your potato plants grow taller, keep adding more hay around them. Think of this as the hay version of “earthing up” potatoes. You want to keep the developing potatoes well covered because potatoes exposed to sunlight can turn green. Green potatoes contain increased levels of glycoalkaloids, including solanine, and should not be eaten.
So don’t be shy with your hay. As it settles and breaks down, top it up. If you see potatoes peeking through anywhere, cover them again.
Hay or straw – does it matter?
Both can work, but there is a difference. Straw is the dry stalk left behind after cereal grains have been harvested. It generally contains fewer seeds. Hay is dried grass and other plants harvested as animal feed, so it can contain more seeds. I use hay successfully, but just be aware that depending on your source, you may occasionally introduce grass or weed seeds into the bed. Whatever you use, make sure it hasn’t been treated with a persistent herbicide that could cause problems in your vegetable garden.
Watering potatoes grown in hay
Hay is fantastic at holding moisture, but don’t make the mistake of assuming you don’t need to check underneath it.
Push your hand through the hay and feel the soil.
The soil should remain evenly moist but not permanently waterlogged.
This becomes especially important once the plants are established and begin producing tubers.
Inconsistent watering can affect your harvest, so I would much rather give potatoes a good, deep watering when needed than little splashes every day.
The thick hay layer helps us here because it reduces evaporation and keeps the soil underneath cooler.
Feeding your potatoes
If you’ve prepared your soil properly with good compost and a suitable organic fertiliser, you have already given your potatoes a great start. As they grow, you can give them additional feeding if needed. Just remember: more fertiliser doesn’t automatically mean more potatoes.
Avoid overdoing high-nitrogen feeds. We aren’t trying to grow the biggest potato leaves in Durbanville. 😂 We want a healthy plant above ground and a beautiful crop developing underneath.
Watch out for pests and disease
Growing potatoes in hay doesn’t mean you’ll never have pest or disease problems. Keep an eye on your leaves throughout the season.
Look for:
holes or chewing damage
aphids
yellowing leaves
unusual spotting
wilting
signs of fungal disease
Good airflow between plants is important, and when watering, I prefer getting the water down to the soil rather than constantly wetting the foliage. And as always, don’t wait until the entire plant is struggling before investigating. Walk through your garden regularly. Turn over leaves. Look closely. The earlier we spot a problem, the easier it usually is to manage.
When are potatoes ready?
This is the exciting part! Once the plants have flowered, you can carefully move some of the hay aside and have a little peek. You may find small new potatoes ready to harvest. One of my favourite things about the hay method is that you can gently harvest a few potatoes and then put the hay back without necessarily pulling up the entire plant.
For a larger, more mature crop, wait until the foliage begins to yellow and die back naturally. At this point, reduce watering and allow the crop to mature. Then comes the treasure hunt. Instead of digging through the bed with a fork and accidentally stabbing half your potatoes, you can start pulling back the hay.
And there they are. Potatoes! 🥔🥔🥔 Honestly, this is one of those harvests that never gets old.
What happens to all that hay afterwards?
Don’t throw it away! By the end of the growing season, the bottom layers will already have started breaking down. You can leave suitable material on the bed as mulch, add it to your compost system, or incorporate the decomposed organic matter into your normal garden management.
That is another reason I love this method. We’re not only growing potatoes. We’re protecting our soil, feeding soil life and returning organic matter to the garden.
Can you grow potatoes this way in containers?
Absolutely. The same basic idea can be adapted to a large container or grow bag. Start with good soil and compost at the bottom, position your seed potatoes and cover them. As the plants grow, continue adding loose organic material around them while ensuring the plants have enough soil, nutrition, moisture and space to develop properly. Just remember that containers dry out much faster than garden beds, so watering becomes even more important.
My biggest tips for growing potatoes in hay
If you’re trying this method for the first time, remember these few things:
Start with healthy certified seed potatoes. Prepare the soil underneath the hay properly. Don’t plant too close together. Keep adding hay as the plants grow. Never allow developing potatoes to sit exposed to sunlight. Keep moisture consistent. Don’t overdo nitrogen. And most importantly – have fun with it.
Gardening doesn’t always have to be complicated.
Sometimes it’s simply a seed potato, some healthy soil, a big pile of hay and a little patience. And a few months later, you’re pulling dinner out from underneath it.
That’s my kind of gardening.
Happy potato planting!
Tash en die Familie
VanZylStead – Our home. Our classroom. Our teaching centre.
Want to Learn More About Growing Potatoes? 🥔 If you want to dig a little deeper, our Garden Day eBook Notes from 9 August include an entire section dedicated to growing potatoes. We cover the different ways you can plant them, preparing and planting your seed potatoes, growing in the ground and containers, and plenty of practical tips to help you get a great harvest. The notes are available from our online store and include 70 pages of practical information to help you plan, plant and prepare your veggie garden for the new growing season.
October is one of those months when the veggie garden suddenly feels as though everything should be planted. The days are longer, the soil is warming up, seedlings are everywhere in the nurseries, and summer is just around the corner. But just because you can find a...
Raised Beds, In the Ground or Containers – Where Should You Grow? When people decide they want to start growing vegetables, one of the first questions is usually: Where am I actually going to grow them? Do I need raised beds? Can I simply plant into the soil I already...
Garden myth: Milk or baking soda for powdery mildew? Every growing season it happens in my garden too. Everything is growing beautifully and then one morning I walk past the cucumbers, pumpkins or courgettes and spot it… That first little white powdery patch on a...







0 Comments