


Spring is in the air. Days are getting longer, and there is no sharp chill in the morning air.
Time to start looking at your garden and see where you could start the new veggie bed for spring.
It all starts with the soil.
Healthy soil = Healthy plants
My first bit of advice – STOP TILLING!!
 Why no till gardening?
Looking around your garden, you will probably find soil tilled for many years, disturbing the soil structure and fungal mycelia connections.
There are billions of microbes living in each corner of the garden.
Undisturbed soil consists of a network of beneficial organisms from bacteria and fungi nematodes, arthropods, and insects, and of course, let us not forget earthworms.
All these microbes form a thriving and prosperous yet fragile ecosystem. The less it is disturbed through tilling and digging, the better.
A NO till bed = no more forks and spades!
You do the work ONCE and only add soil to your bed after every growing season.
BENEFITS of NO TILL gardening?
- You will be freer from pests and diseases due to a more balanced soil population that you are allowing to build up.
- Fewer weeds. Tillage can encourage weeds to sprout by exposing previously buried, dormant seeds to a better environment for growing.
Let’s start the work…
Plan where you are going to make your garden bed.
 Important planning tips to consider
- Sunshine
You will need at least 6 hours of sunshine. Make sure that you know where the sun rises and sets.
Are any trees going to take the sun away from your vegetable bed?
- Water source
Look at your water source, and plan your garden bed’s watering.
In the rainy season, will you have a drainage problem?
- Wind
Keep track of the direction the common wind arrives in your area.
If you stay in a very windy area, plan for a windbreak to protect your plants from wind damage.
- What are you planting?
What are you planning to plant? How much space will you need?
Planting fruit trees, climbing vines, or sprawling vegetables like pumpkins?
Preparing the vegetable bed
Depending on your soil and current ground cover, you will choose one of these options to prepare your bed.
Sheet mulching / Deep Mulching
1. Sheet mulching
In this method, you do not need to pull any grass or weeds.
NO initial back-breaking work, and you can plant on the same day.
This works best when you design a raised bed. With a raised bed, you only add an edge to your bed, and you have an open bottom.
 Raised beds with an edge are more pleasing to the eye, but an edge is not always necessary.
The choice of edging is limitless.
Formal gardens can be designed with wooden edging.
You can use cut branches for a rustic design and an artist’s twist, you can use glass bottles.
Method
- Lay down a layer of cardboard or a thick layer of newspaper in your raised bed or area where you are making the new bed. Make sure the sheets are overlapping.


This process will keep the grass and weeds from growing through – a great way to smother unwanted vegetation or convert a sod lawn into a garden. In no time, weeds and cardboard decompose, and you will feed the soil with organic matter.
- Water the cardboard and/or newspaper.
- Add a thin layer each of (4cm or three fingers)
Green, wet materials (lawn clippings, fresh leaves, and pruning)
Brown, dry materials (autumn leaves, straw, egg holder pieces)
- Water well
- Cover with a layer of newspaper or cardboard.
- Water well
- Fill the bed with good quality well, broken down compost. The higher the quality, the better your plants will grow. You must add at least a layer of 20 – 30 cm of compost. This layer can be higher depending on your choice of edging.
NB!! Should your compost not be broken down completely, you stand the chance of the compost burning your planted seedlings and killing them.
2. Deep Mulching
This is the best method to use if you have heavy clay soil or are dealing with Kikuyu grass.
Method
- Mark out the area you would like to use.
- Dig out the first 30cm, which is the topsoil, and keep it to a side.

- Dig out another 30cm, this is the subsoil, and keep it to a different side.
- Loosen the soil in the bottom of the dug bed.
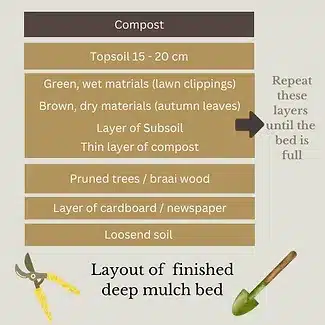
- Add a layer of cardboard / a few layers of newspaper at the bottom of the dug bed.
- Add pieces of wood on top of the cardboard. This can be recently pruned trees or braai wood.
The pieces of wood will retain moisture during the rainy season, acting as a sponge. During the dry months, the wood will release moisture into the bed.
- Add altering layers of each layer about 20cm deep;
Green, wet materials (lawn clippings, fresh leaves, and pruning)
Brown, dry materials (autumn leaves, straw, egg holder pieces)
- Add a thin layer of compost. Water the compost then and add another 10cm of subsoil.
- Continue with these layers until the bed is full. Water each layer well.
- Add the topsoil back to the bed. Your bed should be about 15 – 20 cm higher than the path.
- Water well
- Add a bucket of compost over every square meter of the bed.
Refer to this PICTURE to see what the bed layer looks like.
You can plant immediately because you have added a thick layer of compost onto the bed.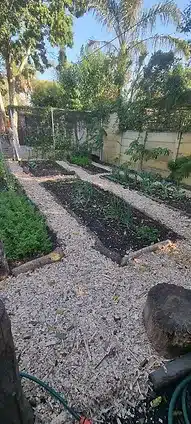
Your bed will be about 30cm higher than the original.
As the material decomposes, your bed will shrink.
Pathways
In between your beds, lay down more cardboard and newspaper.
Add a 10 – 15cm woodchip layer.
This walkway, in time, will break down and turn into humus and add more nutrients to your garden.
Ensure you have an edge for your woodchips so they do not blow away or wash away with the rain.
Happy gardening, friends.
May this new growing season fill you with smiles, may you have dirty fingernails, and may you enjoy a bounty of homegrown food.


0 Comments